 Web iPhoto Access)
https://globs.org/
Web iPhoto Access)When you first log in, if more than one library is shared, you will be presented a page to choose which one you want to look at. It will then be loaded and you will get the default simple search bar (if only one library is available, it is automaticaly loaded).
At any time, you can click the "Select Lib" button in the menu bar to choose another library.
Once a library has been chosen, or when you click "New search" in the menu bar, you get a simple search bar in which you can specify which album you want to look at. By default, the entire library album is selected.

If you need to refine your search, click the Advanced link to get the full search bar capability:

Examples of recognized period formats:
Clicking the Period "Choose" button will popup the date map window for an easier period selection.
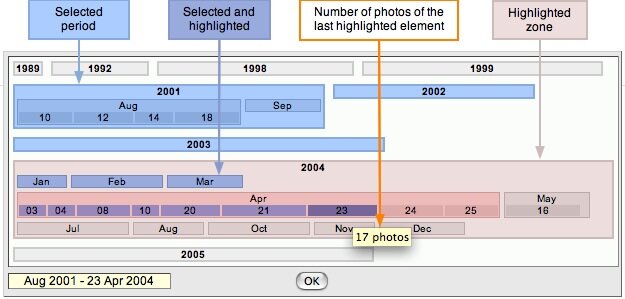
If you don't know exactly the dates of what you are looking for, use the datemap (clicking the "Choose" button). The Date Map will display the years in which the selected album contains pictures. The bigger the block, the higher the number of pictures it contains. If you let your mouse still on a block it will display a tooltip with the number of pictures in that block.
Clicking on a year will then open it and display the month level information. At the same time, the block will turn to blue, meaning that you have selected it. The current period is always displayed in the yellow field at the bottom left corner of the window. Now you may click a month and get the day level the same way.
If you want to select an interval of dates, just click an other block. The entire interval will turn to blue. In fact, the data map always chooses the interval between your last click and the previous one. Unless this is not logic. For example, if you choose Mar 2005, then 2005, it will just select 2005.
Clicking in the white zone of the datamap will just select nothing a first time, and a second click will reset your selection.
Example: You want to select the period Aug 2001 to 23rd Apr 2004:
When you have chosen your period, click OK. If you want to give up and not update the search bar, just click somewhere else in the page.
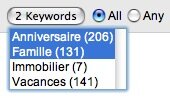
Clicking the Keywords button will popup a list of all keywords used in the current library. Select as many of them as you like (Cmd+Click), and choose if you want to display photos tagged with any of them, or only photos tagged with all of them. The button also updates to let you know how many keywords are selected.
If no keyword have been used in this library, the button is disabled.
Click the New Search button near the top of the window to clear all criteria in the search bar.
If you found more pictures than can fit on one page, a pager lets you go through all pictures. The number of pictures found is displayed in the bottom of the search bar. At any time you can change your search parameters which remain in the search bar, unless you click "New search" again.
 This envelope let you send an e-mail with a link to the current displayed page.
 You can get the full size picture by clicking the small magnifying glass in the bottom left corner of the thumb image.
 In case of a movie, you'll get the camera icon to download and watch it in your browser.
 The slide icon brings you into the slideshow mode, which also let's you see EXIF data for the image.


In this mode you can display the photos you found from your search parameters at a larger size and go forward and backward among them.
 If you want to return to the thumb page, click the grid icon between the arrows.
 The start button above the photo allows you to enter the automatic slideshow mode. You can set how long you want each photo to be displayed, and you can even change this time during the slideshow. 5 secondes is the minimum allowed. To stop the slideshow, click the pause button (replaces the start button when playing).
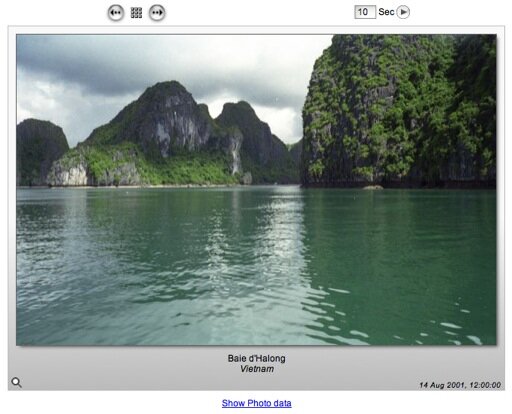
You may click the Show Photo data link to display all EXIF values. The displayed data is usually set by the camera when the picture is taken.

Web iPhoto Access allows the user to select one or more photos for download. Similar in concept to a shopping cart, the user selects the desired photos, then can download all the selected photos in a batch as a compressed "zip" file.
Click on an image to select it for download. Its background will turn to yellow. The number of selected pictures is dislayed in the search bar. You can easily select or unselect all pictures of the current page using the two links right below the search bar. If you selected pictures from multiple searches or pages you can use the special Selected for download album to display them all, and maybe remove some of them.
Of course, you can also select photos during the slidehsow. This is a simple and easy way to view the photos with enough details and directly select those you like.

The number of photos selected for download is always displayed in the search bar: "2 photos to download". To finally get these pictures, just click the download link and WiPhA will generate a zip with these pictures and the extra stuff described just below. The download will begin immediately.
Once you have downloaded and uncompressed your zip file, you will have two files and a Photos folder. If you are a poor PC or Linux user (well you're not so poor on Linux), you're on your own to do what you want whith the pictures in the Photos folder. But if you have a Mac, here's an extra for you, you can import the photos into iPhoto and set their captions and comments.
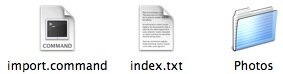
Double click on the import.command file. iPhoto will start here if it's not already open. This can take some time, I know... A new album will be created in iPhoto, and the pictures will get imported in this album, and tagged. A popup will notify you about the end of the import. When you have checked everything is ok, you can trash the script and the pictures.

If you don't know what photocast means, Apple explains it clearly. WiPha automatically photocasts every album of every shared library.
 When you are displaying some pictures, either in a thumbnails page or during a slideshow, the photocast icon appears in the menu bar, and according to your browser, a RSS icon can switch on the in the address bar.

Right-click on the photocast icon (which is a link) or Cmd-Click if you have a one button Mac mouse, and "Copy link location". Then use this url to subscribe to the photocast in your RSS agregator. To subscribe in iPhoto 6: menu File, Subscribe a photocast (Cmd-U) and copy the URL. iPhoto will then begin downloading all fullsize photos of the album (this may be long), and will keep the album up to date.