Thunderbird Extensions
Apple - mac
Donation
Search
Preferences
Connect again ---  123 members 123 members
(nobody)
Visits
2189421 visitors 14 visitors online
Fresh News
Private
|
 Web iPhoto Access - Administration Web iPhoto Access - Administration
WIPHA ADMINISTRATION
FIRST LOGINYou have installed WiPhA properly and just reached the login page.  You must declare yourself as the WiPhA administrator, so log in with the adminstrator password. The default access is:
Enter this login/password and click "Login"; then click the "Admin" item at the right on the WiPhA menu bar to reach the main admin page.  CHANGING THE DEFAULT LOGIN The first thing you should do is to change the default admin login and password. You do this in the first frame, named Administrator. Replace admin by what you want, change the password too, and click "Change" to apply the modification. ADDING LIBRARIES TO SHARE You must now add at least one iPhoto library to share. Enter a name, then enter the absolute path to the library folder. For example, here's the default location, with <user> being as always your short user name: /Users/<user>/Pictures/iPhoto Library Each added library may be edited later to change its name or path; just click its name in the list to get the library modification (rather simple) page.
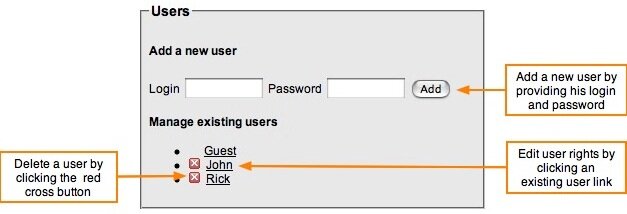
CREATING NEW ACCESS You may create as many users as you want. For each user you will define which iPhoto albums he/she will be allowed to access.
There is also a "default" user named Guest which does not require any login. This is the public access so you may decide not to allow any album for Guest, or limit it to certain albums.
If you (wiPhA admin using Safari) applied a trick like this one to prevent the use of the autocomplete="off" option in login/password fields, you will let Safari overwrite WiPhA default values; as a result, you probably won't understand the behaviour of these admin pages and you're likely to damage your own previous settings.
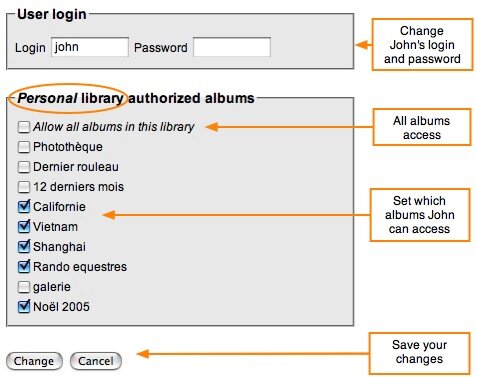
CONFIGURING ACCESSLet's edit John's rights. A click on the John link gets his admin page:  You can change John's login and password the same way you did for the administrator before. Note that you can modify just the login, or just the password, or both. If you don't want to change the password, leave the field empty. And at last, here's the interesting part: Select which albums of the currently loaded library John will be allowed to see. When you're done, don't forget to click the "Change" button. If you share more than one library, you have to load each of them, and define the rights for each. This is where the
The first album item "Allow all albums in this library" lets you grant full access to this library, including all future albums.
ALBUM POINT OF VIEWBack in the main admin page, the last frame named Albums lets you view and set which users have access to an album.  In the same way, click on an iPhoto album and directly set who is allowed to access it 
For your information, all of these parameters are stored in a configuration file in the directory $HOME/Sites/wipha/data.
UPDATE NOTIFICATIONIf a new version of WiPhA becomes available, you'll be noticed about it when you log in (as administrator only, of course). ADVANCED CONFIGURATIONSome additional options may be set in the wipha config file configs/wipha.conf.
Creation date : 27/01/2006 @ 20:05
|

 © 2004-2013

Document generated in 0.16 second
 External Editor
 Yamb
Yamb
 You can directly load a library without going through the user library selection page with this arrow.
 The check icon shows the currently loaded library,
 and the red X deletes the corresponding library (without asking any confirmation).
 Top
Top